
I can do this. This cart is marketed to middle-aged women in craft stores, so it should be buildable by same.
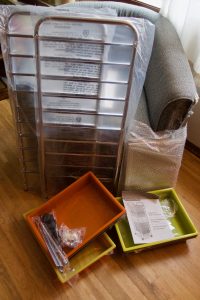
Look how well things are going already: I have the box open.

(Not shown: futilely shaking the box upside down to tip out the contents, then realizing after a period of time known as “too long” that the styrofoam piece was glued into place to keep things from sliding out. Probably I was supposed to open the bottom of the box instead of the top.)
I am beginning to have regrets.
Considerable regrets.
CONSIDERABLE PANICKY REGRETS
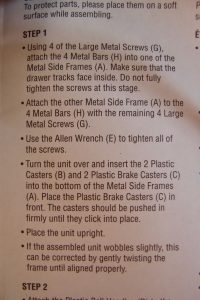
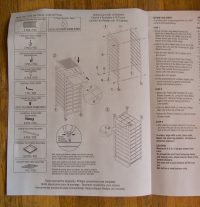
HOW CAN STEP 1 INCLUDE SO MANY STEPS
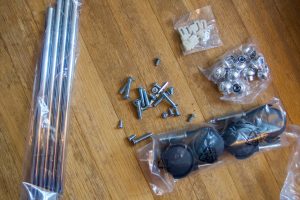
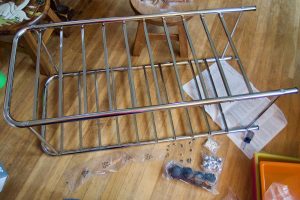
Oh, well this isn’t TOO hard. Four metal sticks hold together the two big side panels. I got all this done before remembering I was supposed to be taking pictures:
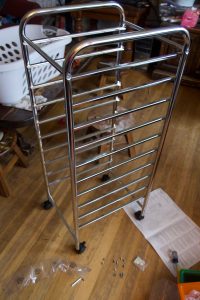
Then you put it upside down, put the wheels on, and flip it upright. The middle of those three steps took me some time: figuring out which wheels were which, and what it meant to go on “the front” of the cart (as far as I can tell, “front” and “back” are exactly the same; perhaps time will tell otherwise). Then I had to push pretty hard on the wheels to get them to click, and I felt as if I were going to break the cart (but did not). So here it is, wheeled and flipped:
A lot of the scary little pieces are just drawer pulls. I’ve done those before. You put the screw through the hole from the inside of the drawer, like so:

And then you screw on the knob:
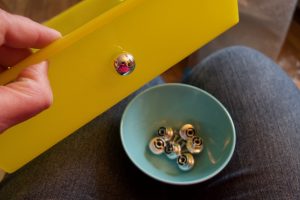
It said I would need a Philips head screwdriver for this, but I just tightened them by hand.
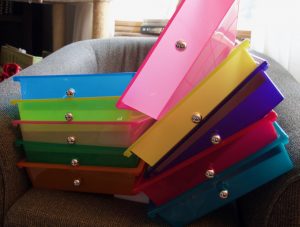
I was greatly encouraged by how many of the little parts got used up with this step. There were two extra small screws, I hope on purpose. And now there is a pile of pretty drawers:
The next step was a little tricky. It said to clip the metal shelf to the metal bars, but it didn’t say how that would work. There were two rounded absence-of-metal-bar-shaped parts on the bottom of the shelf, but—and I don’t know if I can explain this right—there was not space to put them both in place at the same time: if I clicked ONE into place, the other would be sitting diagonally and not line up anymore. So I tried to click them both down at once, but that didn’t work and the cart felt too fragile for the heavy leaning that seemed required. So then I clicked one into place, then tried to sort of push the other metal bar forward so it could click too. This did work, but I kept worrying I was going to pinch my fingers so it took awhile longer than it should have.
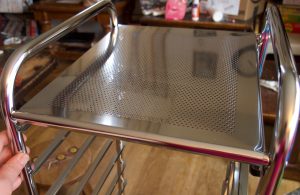
And finally, the only step of this entire project I actually wanted to do:

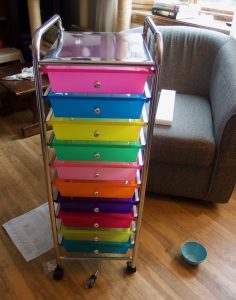
The final step after this one involves flipping the whole cart upside down and putting little locking clips on all the drawers so they won’t slide all the way out of their slots anymore. But I need to think more about the order I want the colors, and I know Elizabeth will want to weigh in on that too, so I’ve just put those clips aside for now.
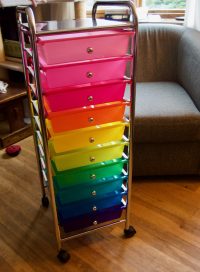
Update: Edward came home from school and within five minutes had “fixed” the “wrong” drawers. I thought others might feel similarly and be soothed by the sight of the adjusted situation:

One tiny piece of advice: Tape the Allen wrench to the back of the cart. You might need it later on for re-tightening the frame. Over time it can loosen slightly and then the drawers can fall down.
Yes!! We have one of these and this is excellent advice. We moved it from one child’s bedroom to another and it required some adjustment.
Oh, good thought!
I love these posts, please never stop blogging.
Thank you, Edward. Also I want one!
Yes, Edward! Excellent.
“How can step one have so many steps.” Hilarious and also a VALID QUESTION.
May God bless Edward because I would have been bothered for far too long by this non-rainbow situation.
Once you had posted about buying this, I happened to see one in our local Habitat for Humanity ReStore and thanks to you I realized that they were asking more for it secondhand than it costs brand new. Guys, that’s not how secondhand works.
Also, I love it! Nice job putting it together. That is an alarming number of teeny bits.
I’ve often been surprised by how much the ReStore charges. Yes, it’s for charity, but I’m not keen on paying almost full retail what is, after all, still second-hand stuff that was donated and is in as-is condition with no warranty.
I have this cart but with “frosted” white drawers, with a bit of a swirly pattern on the front. I could just tell that I would be vexed by the non-standard rainbow situation. What are you going to keep in yours? Mine has art supplies. I have another with mesh drawers that I desperately want to make into a charging station, but apparently not desperately enough to round up all the cords and chargers and devices and clips and make space. #overwhelmed #andlazy
Elizabeth and I are debating the use. Our original idea was nail polishes, and we may still keep those in some of the drawers, but there’s too much space for just nail polishes. Maybe nail polishes in some, fancy paper in some, and ???? in some.
Thank you little man! You are my hero. That was incredibly satisfying, thank you for including the after picture. Hug that child for me and give him a cape or something. <3
You may have put together the complicated cart and shown us how but the real hero of this story (count the comments to confirm) is Edward!!
Yes, accolades for Edward.
Thank heavens for Edward.
I’m chiming in super-late on this to say:
1. You made me laugh so hard I started coughing. When I stopped coughing, I started laughing again, because SO MANY STEPS is a question I’ve shouted at instruction sheets many a time.
2. Edward is a hero of the realm. And you’re a heroine, for posting the soothing update.